This is the third project from the Craigslist big box of guitar junk, from the music kid.
I've built lipstick Strats before, but not for myself. Just by the nature of the pickups and tone cicuits, lipstick Strats are almost always "partscasters". Custom.
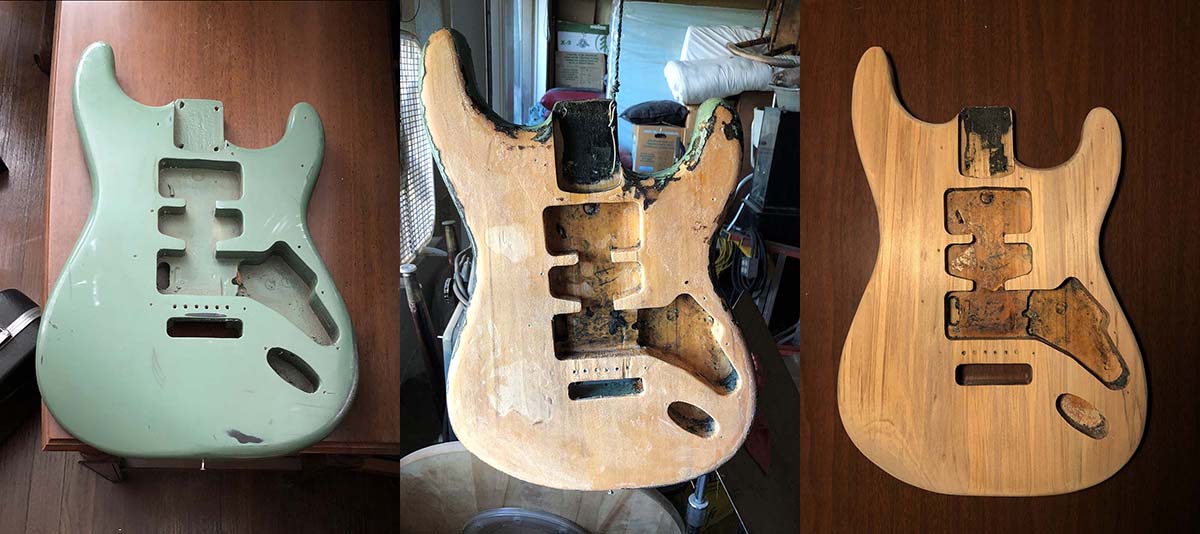
SRV's "Charley", his lipstick Strat, was a "partscaster". He loved lipstick pickups. I planned to emulate that guitar (at least in the wiring). The starting point, a nasty, sticky green Strat style body and unbranded sharkfin neck was the starting point. The wood underneath the mess of mixed finishes would determine the final finish.This is the gross green Strat body. Green. Green = danger in the home built instrument world.
If you pick up a home built guitar and it's green, good bet it was somebody's first project. They always pick green for the first one.The paint on this thing had never cured. Odd, since here in dry dusty desert hell -everything- dries out, eventually. Paint stripper was the option. I was concerned this thing was probably DOA. It had all the resonance of a big wad of wet newspaper. But you never know what lies beneath a guitar finish. So... onward.
What was underneath? A huge mess. This is after 3 coats of stripper. Under the green was thick black poly. Which, I think, was the original color. Under the black poly, a nice thick layer of mystery epoxy. Thank you budget guitar specifications bean counter guy. The stuff is essentially indestructible. Paint stripper does not have any effect. A heat gun, set on incinerate, does cause it to splall off in tiny, tiny flakes. Unfortunately, at this heat setting the wood underneath begins to char. Since the gummy green was 95% gone, sanding was an option, So I put on the mask and went to work.
Several hours and a stack of sanding disks later...
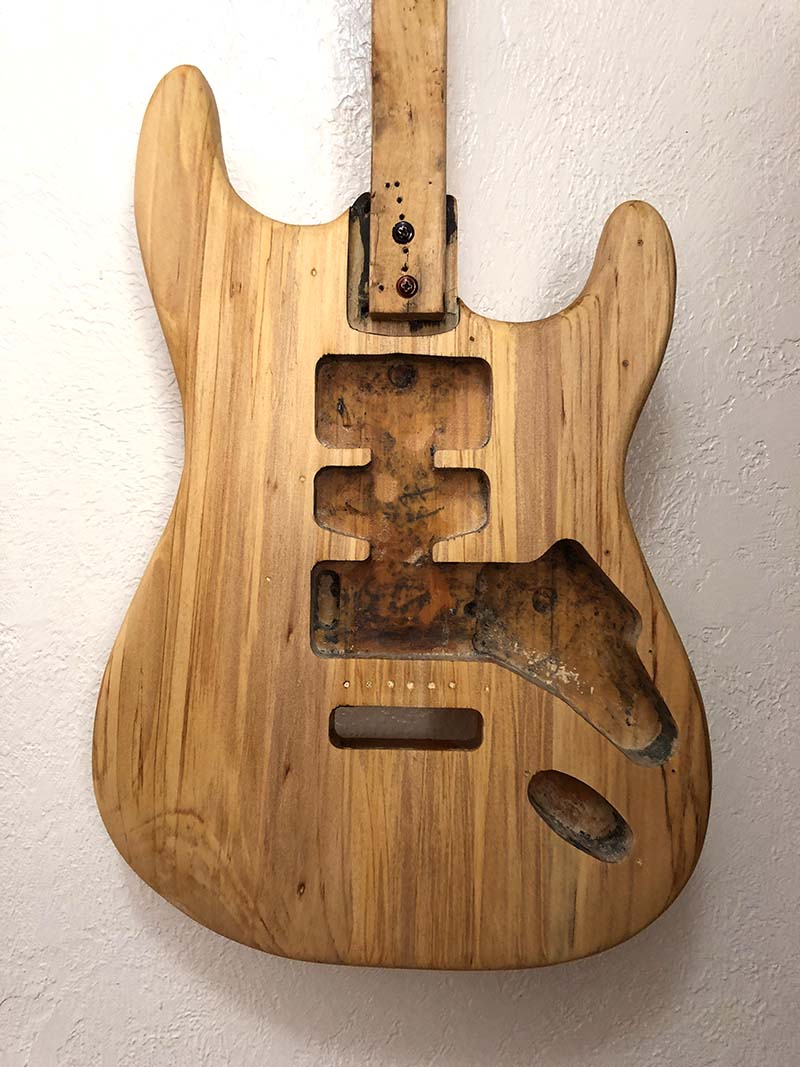
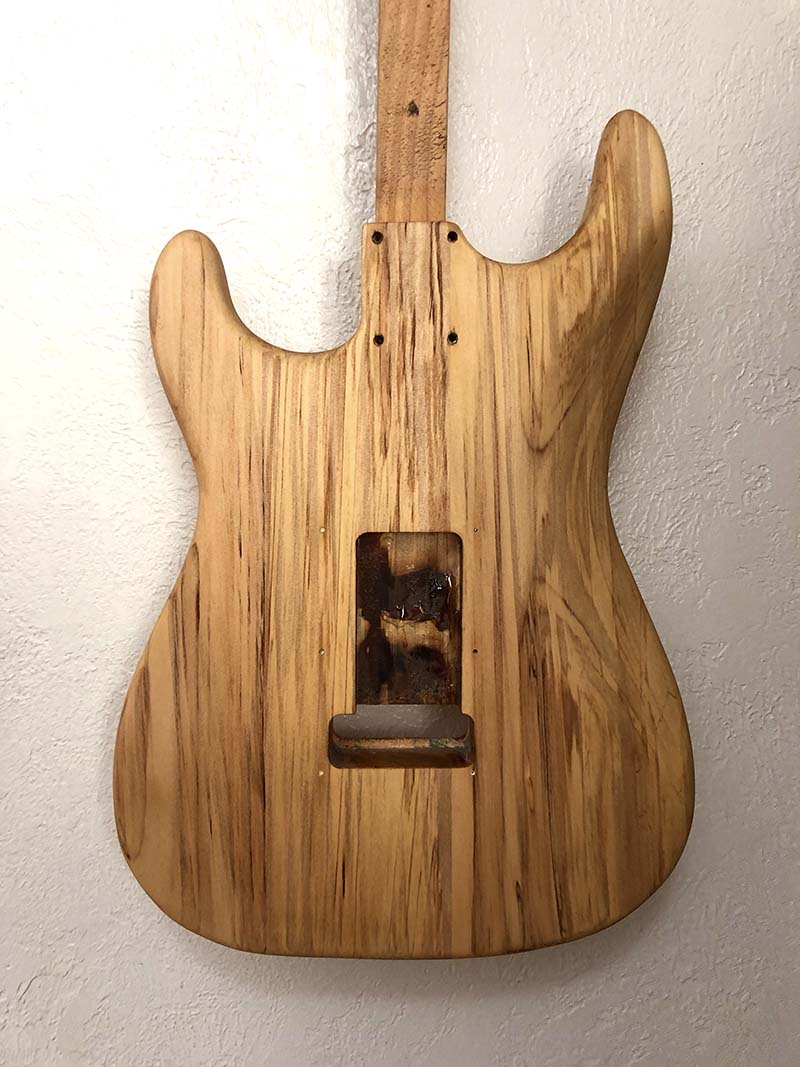
The wood looks pretty nice! Also, it now has a nice resonant ring when rapped on. I really like the bare wood grain on this one. So, no sunburst, just something to pop the grain and a clear coat.
The epoxy in the route pockets is going to stay. There is no way to get it out. I tried the heat gun again (in the pocket on the left), and you can see the wood underneath has started to char. One bit of epoxy did crack and pop out. Just a flake and not the whole thickness. Gives you an idea of how thick it was laid on. I'd say the average epoxy thickness was between 1/16th and an 1/8th of an inch thick. Front and back. I was VERY careful not to take off any wood. Still, starting at 1-3/4" thick, the final body thicknes, minus epoxy, ended up being 1-5/8". About the thickness of a Fender Squier Strat body.
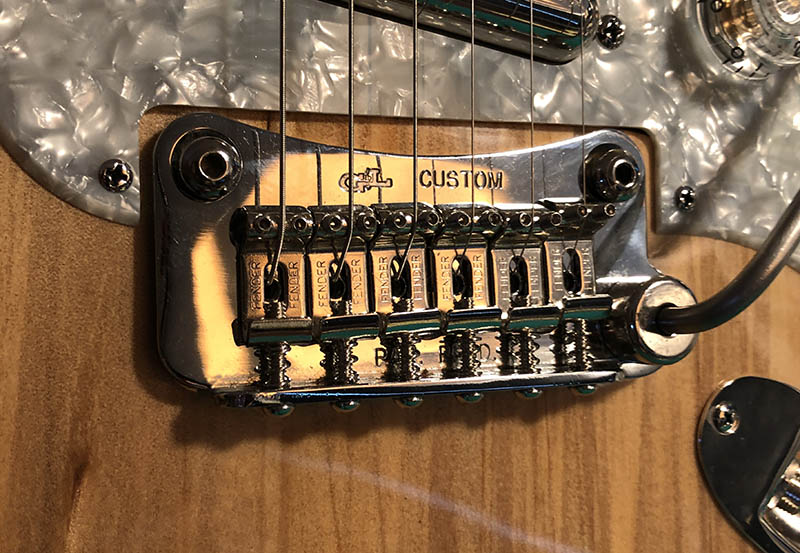
Visible in the middle pickup route, buried under epoxy in grease crayon is the number "17". This guitar is now named "17".
1- It's green, is it junk?
2- Yes it's probably junk.
3- Ok, it's not junk.
I did a few photoshop mock-ups at this point, deciding where to go with this one. The winner was: pearloid pickguard, full size lipsticks, old G&L custom two point floater, one volume, one tone. one 5-way. rosewood fretboard, big naked sharkfin headstock. A cross between Bonnie Raitt's partscaster and SRV's "Charley".
After a final sanding, I wiped on a 1# cut of very light blond shellac. This pulled out the grain nicely. Even though this body was encased in indestructible rock hard thermoplastic, I'm still a bit gun-shy about silicone contamination. Every other body in the big box has been contaminated. So, several coats of wiped on shellac sealed this one.
Front, after the first coat.
One coat of shellac on the back. Nice grain patterns. I know this will lighten up a bit, once all the alcohol evaporates out, but it's a good start.
Three coats of shellac, leveled. Then, about nine or ten thin coats of nitro lacquer. Wait two weeks, sand with 600, 800, 1200, 1600, 2000, then rubbing compound, polishing compound, and carnuba wax. Glossy, shiny, no contamination. Another week or so hanging, to harden enough to handle safely.
The neck was generic sharkfin Strat style neck, no decal or branding anywhere. It was a nitro finished neck originally, and I added a coat as well. The truss rod hole is lined with what looks like a piece of black plastic tube. Could be something else, but I think it's too thin to be wood. Also, the tuner holes are 1/16" closer together than a normal stock Fender Strat, except for the Fender Bonnie Raitt Strats. I'm a bit confused by this neck. The build quality is very good, but the layout is odd, and the wood does have a few sap pockets on the headstock face. Also, the nut is bone.
Anyway, the truss rod works fine, the neck is flat and straight, and it has a nice modern profile.I have some early 70's "F" tuners on hand, but they (just barely) don't fit. Also, the headstock was already drilled for 10mm tuner bushings with 45˚ screw tab machines. So, I used some Gotoh/Schaller generic machines.
Gotoh/Schaller machines installed. Good enough.
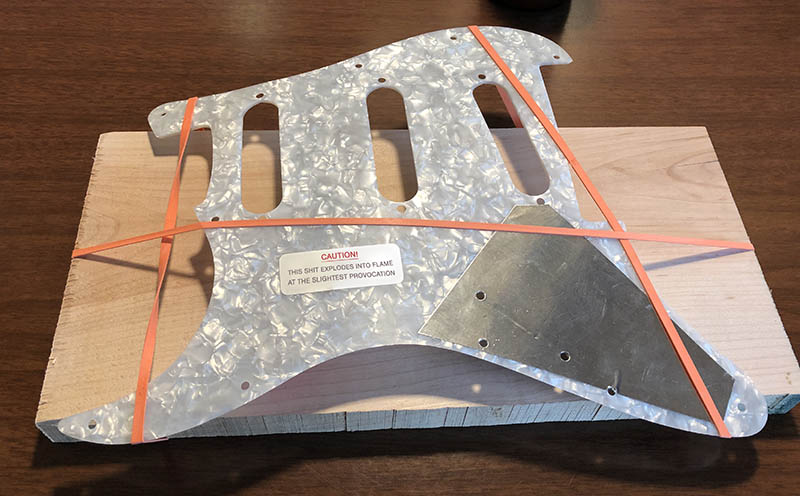
I ordered a real celluloid/pearloid pickguard from Warmoth. They let you specify the control layout and pickup routes. Handy! Their stuff is good quality, but celluloid is a PITA to work with. Of course the first pickguard showed up warped like a pringles chip. It sprung up about 1-1/2" in the middle. Unusable. I hopped on the phone and a replacement was on the way before I hung up. It, too, arrived warped (the nature of celluloid, I guess). But not nearly as twisted as the first one. I strapped it to a plank, warped in the opposite direction and set it in the sun for a couple weeks. It eventually came out nice and flat.
The magic parts. CTS 250k pots, pushback wiring, Mullard metalized polyester fish cap (at 0.047uf) wired on the output lug for presence and treble at part volume.
5-way, one volume, one tone. All you really need.
These are Seymour Duncan "strat sized" lipstick pickups. Of the current US makers of lipstick pickups, only Curtis Novak, and Nep-Tone make real alnico 6 lipsticks, as far as I know (and NepTone may be out of business). I was going to order a set from Nep-Tone, and route the pickguard and body routes (full sized lipsticks are quite a bit longer) but this slightly used, strat-sized Duncan set fell into my lap at just the right moment, for next to nothing. They fit tightly into the Fender single coil sized routes. Nobody at Seymour Duncan is sure what magnet they use (I asked, repeatedly). Marketing says "A6, wait... A5, let me check.", engineering says "huh?", customer service says "It's ALWAYS been A5!" Who knows (they don't). They are chimey and jangly, like most low DCR lipsticks. But when overdriven, that brass tube choked sharp Dano A6 mid-growl is slightly less of a gut punch. For surf music, jazzy tunes, they are great.
The Duncan strat sized neck pickup. A tight squeeze, but it fits. These pickups sound great. Clean and jangly, without much of the Strat "quack"
All together now.
Stainless oval head #6 x 1/2" sheet metal screws for the pickguard, polished. Stainless 10-32 x 5/8" oval head machine screws for the pickups, polished.
The G&L bridge require two 1/2" holes for the post bushings. I went slow, up a size at a time. On the last drill, at 1/2", the bit knocked a chunk loose on the treble side. I ended up using epoxy and sawdust to glue the chunk back in place and fill the chips. You can just barely see it here (the darker patch).The plastic trem arm tip will get swapped with a chromed brass tip here shortly.
Using common Home Depot/Lowes screws, you'll need to polish up the stainless, and polish off the zinc coating on plain screws. The easiest way I've found is to screw them all into a stick and do them at once on the buffer/snatcher. Hot water and an old toothbrush gets the leftover compound out of the slots.
I like Gibson style speedy knobs. You can roll off the volume with your pinky with ease. One volume, one tone. Clear lets the pearloid shine through.
I'm never out of neck plates as long as I have a scrap steel pile. 1/8" thick, countersunk, rounded and polished. The neck is secure.
The original G&L Custom two point bridge is a classic, well designed bridge. Along the way, I had used the original G&L saddles on a FrankenTele (decades ago), but original Fender saddles work just fine. I usually set up the bridges to be full floaters. This bridge has a massive steel block, and the tremolo arm just slips in.
The bridge will dive E to A, and pull E up to G. I could raise it slightly for more range, but this range is plenty for me.
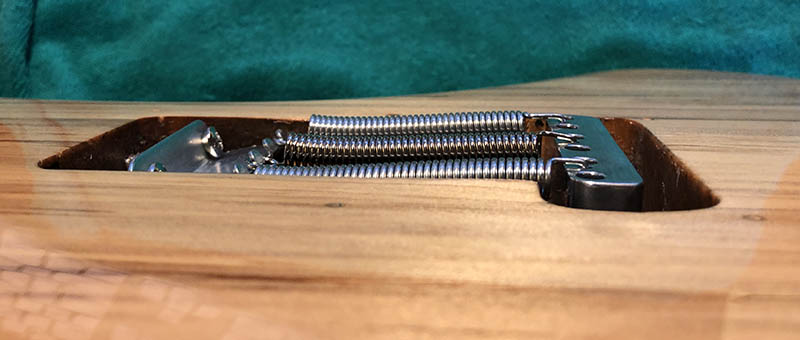
And now the problem with a 1-5/8" final thickness of the body...
The block and springs are now significantly proud of the back of the body. Demonstrating well just how much epoxy was caked on this thing. Seems like most Squier people leave the too-tall block and springs exposed, but this just seems... wrong. I could grind down the block, re-drill the spring holes and re-countersink the string holes, but, I need to make a spring pocket cover anyway. Making one domed slightly is no big deal. Might look kinda cool, in fact.
So that's what I did. I started with 16 ga. steel, cut out an oversized piece and went to work on the planishing hammer (yeah, I forgot to take pics). Once it was domed enough, I flattened out the edges/flanges, trimmed it to size, and sanded the edges square on the belt sander. Then I marked off the holes and slot and drilled. All the holes are countersunk. The slot is made with a series of holes and then filed out to shape. Sanding is next. Lots of sanding, and still not quite enough... The planishing hammer leaves hammer marks, and while hammer marks can be nice looking, I wanted smooth instead. 16 ga. is plenty thick enough to sand seriously, and remove all hammer marks. Once sanded, it goes to the most dangerous tool in the shop, the buffer. AKA, the grabber, the snatcher, the flinger. The smasher. Today, it -didn't- grab my work, or shoot it into my foot, or across the shop, into the wall. Yesterday it snatched the screw polishing stick out of my (gloved) hands and shot it 30 feet, landing exactly halfway under the Alfa.
In the montage below, you can see the hammer marks on the inside of the cover. I can't imaging why some Chinese factory isn't stamping these things out for all the thin body Fender Squier Strat players that have upgraded to a steel or brass full sized tremolo block. And the string holes DO line up with the slot. The guitar was just laying on the tremolo arm during the pic.
All done, except for the tremolo arm tip. It sounds exactly like it should, and plays very easy.
And now it hangs on the junk guitar wall.
Three done, eight more in the box to go.
Chrome tremolo arm tip added... ok, now it's done.